ONE ROOM CHALLENGE * WEEK 3 * HOME GYM MAKEOVER PROGRESS
We’re rolling in for Week 3 of the One Room Challenge, which means we are half-way done with the 6 week challenge. Eeek! This week I’m sharing the progress of our home gym makeover. If you’re just reading for the first time, catch up with Week 1 and Week 2.
We started by removing the old insulation. The existing insulation smelled worse than hot garbage and moldy cheese mixed together. I’ll spare you the details, but it had to go. Smelly insulation be-gone. After we pulled out all the old, we used Pest Block insulating spray foam to seal up all the cracks and crevices. We finished by adding new insulation. Because these two walls are exterior walls we definitely needed to re-insulate. We do live in the frozen tundra, so it’s very necessary.
We also tackled the closet. The images below show: the before, first coat of paint, second coat of paint and new closet system installed (mostly). Naturally, I need to run to Home Depot, again, as I need another shelf and more end caps. We also have a drawer set on order for the right hand side of the closet. Once the closet is fully installed, I will share a full post on all the details. You may have also noticed we swapped out the light bulb for a more sleek light fixture. We found a 7.5 inch LED disk light on Amazon for a better price than what we could find at the hardware stores.
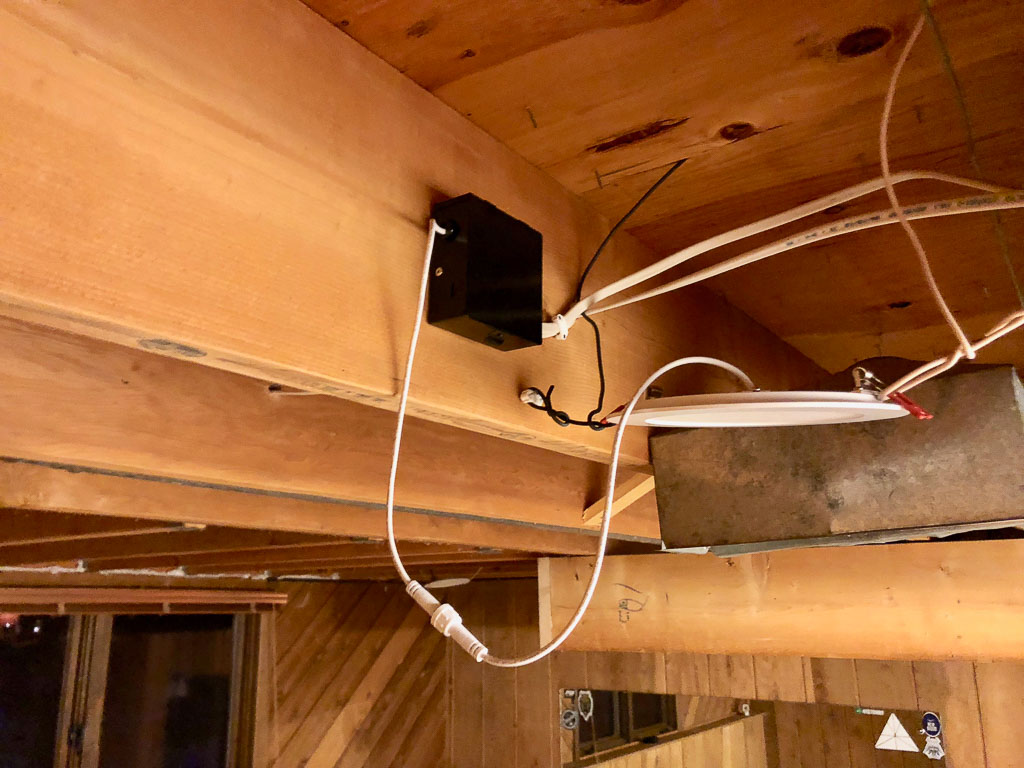
The other exciting update is the lighting. We swapped out the old, dated fixture for low profile recessed lights. My bro-ham suggested this one and I have to say we are very impressed. Not only were they easy for him to install, but they make a HUGE difference in the room. Lighting changes everything, guys! How do they work? Well, the wire runs into the little black box, which can be mounted anywhere. The low profile light is then plugged into the black box. The lights can also be mounted just about anywhere, but our ideal for low profile ceilings with limited clearance. We currently have them hanging from wire until the new ceiling is installed. Once the ceiling is in place, we can attach them to the ceiling.
As with any home renovation, there always seems to be a monkey wrench thrown into the mix. Our wrench occurred on Saturday evening, after a long day of working. We were cleaning up the room and we heard a freaking FROG in the wall. Yes, a FROG. I shared the video on our insta stories shortly after it happened. What does one do when there is a frog in the wall?! We started by setting mouse traps for the night. If there was a frog in our wall, then we were certain other creatures were in the wall. A few days passed and we caught nothing. So, for peace of mind, we decided to pull the wall apart. We pulled away the cedar panel, plastic and insulation, only to find cinder blocks. We were expecting a framed wall with block behind the framing. Maybe a crack in the block or foundation where the frog welcomed himself into our wall. As it turns out, this silly story has a boring ending. There were no cracks in the cinder block, so we sealed the wall up and went our merry way. End of frog story.
While it doesn’t feel like things are moving fast, we did accomplish a lot considering this is an evening and weekend project. To recap: the closet is 85% done, electrical is completed and fresh insulation has been installed. The current state of the room looks like this:
This weekend, we will be finishing an accent brick wall, so the ceiling can be framed and installed. Once the ceiling is up, we’ll be able to move onto the flooring. Wish us luck and cross your fingers for zero frogs/road blocks!
Join us for another weekend adventure on Instagram stories for the behind the scenes photos, videos and shenanigans.
This week’s homework is:


